|
| Picture 1 |
High waters scupper the Grayling fishing yet again, and although we have recently had a short period of more settled water, at which time I did venture out and catch the odd fish or two, unfortunately it has not lasted long enough to warrant arranging a trip or two for those wanting to get out there and fish for Grayling, however we have now earmarked a couple of sessions in the near future, water conditions permitting.
Meanwhile, whilst conditions are unfavourable, I thought we could take advantage of this time off the river and look at something
 |
| Picture 2 |
constructive that some of you may find useful during your future fishing trips when the river levels settle down again. So to that end I thought we might take a look at a way of using some of that spare backing line that may be sitting in a drawer somewhere gathering dust, and putting it to good use in the form of "sighters" for Grayling fishing.
 |
| Picture 3 |
A sighter is simply a name that has been given to a type of bite indicator that you can incorporate into your leader set up to help you identify what can often be the slightest indication of interest from your quarry, and although trout anglers will also adopt this approach, you will find that it is more commonly used by Grayling anglers whilst using a variety of nymphing techniques. One of the main reasons for this is that Grayling can often be very subtle takers, and therefore any additional help to identify these takes can give us a great advantage when it comes down to actually hooking up with these fish.
 |
| Picture 4 |
I personally like to use a sighter from time to time for my winter Grayling fishing simply because of the variations in light we often encounter as anglers throughout the day, making the business end of your fly line very difficult to see at times, therefore something that stands out against the back drop can be a welcome addition to your armoury, especially if your eyesight is not great, "like mine, for all I hate to admit it I think it may be an age thing".
 |
| Picture 5 |
So by attaching this simple to make sighter to the end of your fly line, let's say for example, for Czech/Polish Nymphing, (one of it's many uses) we can then use this indicator almost like a swing tip works for coarse anglers whilst following our team of flies as they travel through the water columns at the depths and speeds we wish to fish. You can either keep the end of your sighter just off the surface of the water, watching for the slightest indication of a take, (this is the more common approach) or, (remember there are no hard and fast rules here) you can lay the sighter on the water surface (this is often dictated by the speed of flow and depth etc) and use it as an indicator in this way too. The choice is yours!
 |
| Picture 6 |
So what do we need to make our sighters?
Not much you will be pleased to hear, you will probably have most of it at home already. Here is a list of items required to make your bespoke sighters:
- Scissors, Tapestry Needle, (size 22) Super Glue (picture 1)
- Indelible Marker, AA Battery (picture 2)
- Backing Line, Tape Measure (picture 3)
 |
| Picture 7 |
Once you have all these things in place you can now set about making your bespoke sighters. To help with this task I have included a series of pictures (starting from picture 1 above) and a step by step explanation of the process below:
 |
| Picture 8 |
1. Thread the end of your backing line (whilst still on the spool) through the eye of the tapestry needle (picture 4). Why use a tapestry needle I hear you say! Well you can use an ordinary needle, but as a tapestry needle is purposely blunt (has a rounded business end) it is easier to slide through the centre of your backing line, without it constantly popping out of the side wall during the next process. (I find that a size 22 tapestry needle works well with backing line).
 |
| Picture 9 |
2. Now push the business end of the tapestry needle through the side wall of the backing line (picture 5). This is a bit fiddly, but it will go through.
3. Once your needle has penetrated the side wall of the backing line, push the needle gently through the centre of your backing line for about 20mm (picture 6). You can push it through a little further if you wish, but the further you push it through the more difficult the next stage becomes!
 |
| Picture 10 |
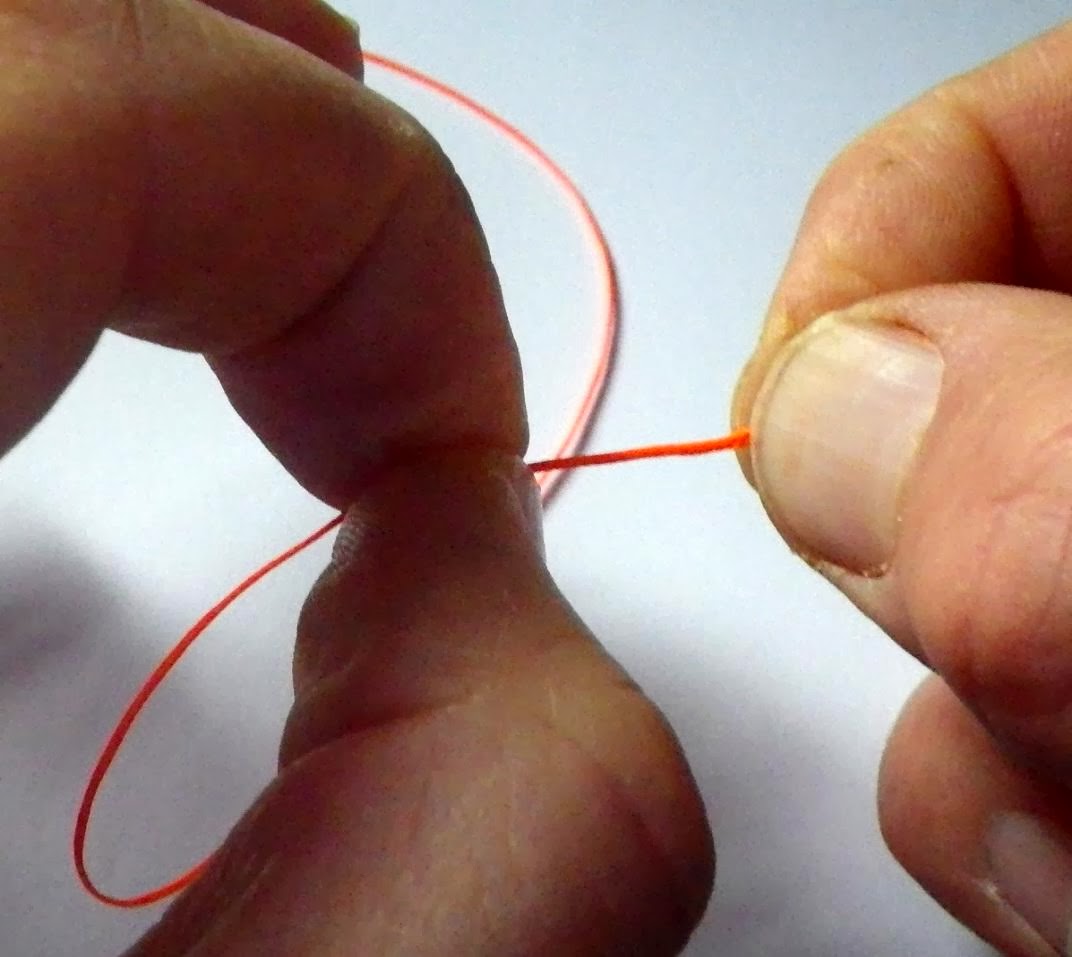
4. At this point make the needle exit the side wall again (picture 7) and continue pulling the needle all the way through. This will also pull the threaded backing line into the centre of itself (picture 8) and back out of the side wall again (picture 9). Continue pulling the backing line through itself until the tag end pops out, (picture 10) taking care at this stage not to pull the backing line completely into itself at the top end (opposite end to the needle in picture 10) as the objective is to leave a small neat loop peeping out (picture 10). Keep hold of this loop as you pull the needle clear so that this cannot happen. You can then neatly form your loop by gently pulling the loose tag end to accommodate the size of loop you require. I like a small loop of about 5mm - 7mm, but this is simply a personal preference.
 |
| Picture 11 |
5. Now completely remove the needle from the backing line. Once the needle is removed and you have successfully formed the loop to the size you require, use your scissors to cut off the excess tag before tidying up the section the needle went through (picture 11).
 |
| Picture 12 |
6. After you have cut off the excess tag, you can now tidy up the section the needle went through. By waiting until now to do this, enables you to draw this slightly out of shape stretched section of the outer layer of your backing line, neatly over the cut off tag end as you smooth it out, (picture 12) affording you a neat seamless finish (picture 13). You have now successfully completed one end of your sighter.
 |
| Picture 13 |
7. Now measure this length of backing line to the length you prefer for your personal fishing requirements, this will often be unique to the individual. If you have never used a sighter before then I suggest you make a couple of different sizes to try out first, allowing you to see which you prefer whilst fishing. One at 40cm and one at 50cm. Always measure an additional 5cm over and above the size you require before cutting, as this will allow for the inevitable shortening of the sighter as you create the final loop (picture 14).
 |
| Picture 14 |
8. After cutting your backing line to your desired length, follow the same guidelines as before to create your second and final loop at the opposite end of your backing line. Your sighter is now almost complete, all we need to do now is mark it up (or not, once again the choice is yours).
 |
| Picture 15 |
9. As mentioned above, at this stage you can either leave the sighter as it is, (all one colour) or mark it intermittently. In this case, as I am explaining the complete process we will mark this one up.
10. This is where your AA battery and indelible marker come in handy (picture 2). The AA battery is just a personal preference as I find it offers me just the right diameter for what I require, but in all honesty what you use is entirely up to you, I am sure you will have your own preference after making a few up.
 |
| Picture 16 |
11. So, take your almost completed sighter and wrap it around your AA battery in relatively neat turns (picture 15). Once you have wrapped it around the battery, tidy up the turns, (i.e. shuffle them together) and then take your indelible marker (picture 16) and colour in approximately one third of the wrapped turns of your sighter (picture 17). Make sure you have coloured them in well and the marker has permeated the turns of your sighter, this will save you having to touch it up with the marker after it has been removed from the battery.
 |
| Picture 17 |
Now simply remove your sighter (backing line) from the battery and you should be presented with neat and uniformed intermittent marks throughout it's length (Picture 18). All that remains to do now is put a small dab of super glue on the loop joints (picture 19) and you're good to go. Don't use too much super glue as it will make the ends of your sighter hard and brittle (just a dab).
 |
| Picture 18 |
When fishing with these sighters using the Czech/Polish nymphing techniques mentioned above, they are commonly attached to the business end of your fly line with a loop to loop connection and in turn, your leader is attached to the opposite end of your sighter, also with a loop to loop connection, allowing for a quick and simple way to change your leader, or your sighter, or both when required, whilst at the same time affording you the ability to quickly introduce a simple visual aid to help improve your success rate.
 |
| Picture 19 |
These sighters can be made from other materials too, such as braid, using the same technique, and it is also worth making them up using a variety of colours to combat the ever changing light variations (as mentioned above) and differing back drops we encounter whilst fishing for these magnificent fish that offer us an extension to our fly fishing season on the river.
 |
| Picture 20 |
Good luck with your new sighters!!!